Local
Opta Local enables you to setup a local Kubernetes environment on your PC using the Opta CLI so that you can test services locally without having to pay for cloud resources or waiting for real infrastructure to spin up and down in your cloud provider. It is designed to get you quickly started with Opta and Kubernetes for development and testing without the complexity, cost and learning curve of using a public cloud provider. When you are ready to go to production, the Opta infrastructure-as-code files you create for Opta Local can be used to deploy to AWS, Azure or Google Cloud.
Installation
To install Opta, follow this one line installation (detailed instructions):
/bin/bash -c "$(curl -fsSL https://docs.opta.dev/install.sh)"
Architecture
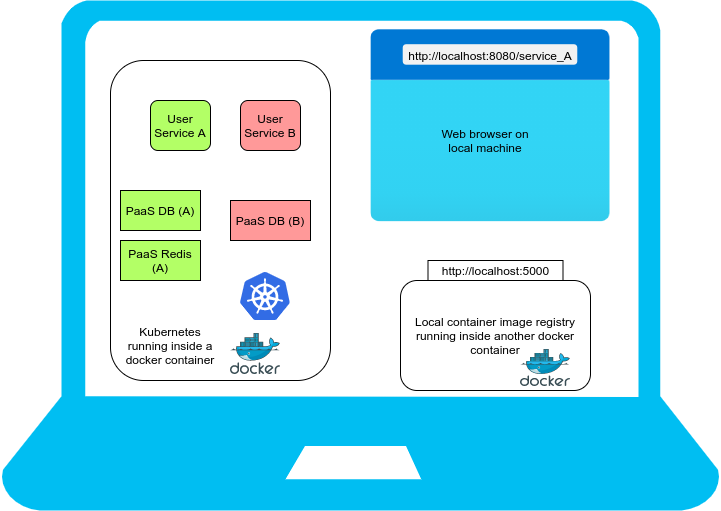
This diagram shows what an Opta local installation will look like inside your local machine. Opta Local installs a Kubernetes Kind cluster. Kind is a tool for running local Kubernetes clusters using Docker container “nodes”. Kind was primarily designed for testing Kubernetes itself, but may be used for local development or CI.
Opta Local also installs a local container image registry to store your application images when you use opta deploy. This docker registry is available at http://localhost:5000.
As a user you can deploy a single Kubernetes Kind cluster on a local machine and then deploy multiple application services (for example, service A and service B) Internally, Kind uses nested containers to run Kubernetes pods inside the Kind container.
Opta Local also provides platform-as-a-service by creating Mysql, Mongodb, Postgres or Redis (more PaaS platforms are being integrated, contact us if you would like to see a specific PaaS for your use case). Multiple service platforms of the same type are possible. So for example, Service A and B use isolated PaaS databases in the picture above. Services can be accessed on http://localhost:8080/ and subpaths. Service A has been configured to be available at http://localhost:8080/service_A in the figure.
System Requirements
Running Opta Local needs a reasonably powerful PC. These requirements are not for running Opta itself, but for spinning up Kubernetes and running your services on it.
- A Mac OS or Linux PC with a minimum 8GB RAM and a recent i5 processor.
- Fast internet connection
- Ample diskspace (at least 10GB free) to store container images locally
- Please install the prerequistes for opta listed here. You can exclude the public cloud specific pre-requisites if you only want to run Opta Local.
- Opta Local assumes that the logged-in user can operate docker without sudo; to enable this follow the steps here: MacOS or Linux ).
- Opta Local requires local ports
5000(docker registry) and8080(ingress port for local Kubernetes cluster) to be free.
Getting Started
Running your application in Opta Local environment is almost identical to how you would run them on public cloud using the Opta CLI. We show a couple of opta yaml examples to get you started.
Example 1: Deploy a service using an existing docker image
We will deploy a simple hello app by defining these files.
# hello.yaml
name: hello
org_name: localorg  # Optional, this can be set to your organization's name
modules:
  - type: k8s-service
    name: hello
    port:
      http: 80
    # from https://github.com/run-x/hello-opta
    image: ghcr.io/run-x/hello-opta/hello-opta:main
    healthcheck_path: "/"
    public_uri: "/hello"
Opta will install a local Kubernetes cluster on your laptop the first time you deploy your application locally.
Deploy your application by running:
opta apply --local -c hello.yaml --auto-approve

# example of output
...
╒═══════════╤═══════════════════════════════════════╤══════════╤════════╤══════════╕
│ module    │ resource                              │ action   │ risk   │ reason   │
╞═══════════╪═══════════════════════════════════════╪══════════╪════════╪══════════╡
│ localbase │ null_resource.k8s-installer           │ create   │ LOW    │ creation │
├───────────┼───────────────────────────────────────┼──────────┼────────┼──────────┤
│ localbase │ null_resource.kind-installer          │ create   │ LOW    │ creation │
├───────────┼───────────────────────────────────────┼──────────┼────────┼──────────┤
│ localbase │ null_resource.local-base              │ create   │ LOW    │ creation │
├───────────┼───────────────────────────────────────┼──────────┼────────┼──────────┤
│ localbase │ tls_cert_request.issuer_req           │ create   │ LOW    │ creation │
├───────────┼───────────────────────────────────────┼──────────┼────────┼──────────┤
│ localbase │ tls_locally_signed_cert.issuer_cert   │ create   │ LOW    │ creation │
├───────────┼───────────────────────────────────────┼──────────┼────────┼──────────┤
│ localbase │ tls_private_key.issuer_key            │ create   │ LOW    │ creation │
├───────────┼───────────────────────────────────────┼──────────┼────────┼──────────┤
│ localbase │ tls_private_key.trustanchor_key       │ create   │ LOW    │ creation │
├───────────┼───────────────────────────────────────┼──────────┼────────┼──────────┤
│ localbase │ tls_self_signed_cert.trustanchor_cert │ create   │ LOW    │ creation │
╘═══════════╧═══════════════════════════════════════╧══════════╧════════╧══════════╛
...
Apply complete! Resources: 8 added, 0 changed, 0 destroyed.
...
╒══════════╤══════════════════════════╤══════════╤════════╤══════════╕
│ module   │ resource                 │ action   │ risk   │ reason   │
╞══════════╪══════════════════════════╪══════════╪════════╪══════════╡
│ hello    │ helm_release.k8s-service │ create   │ LOW    │ creation │
╘══════════╧══════════════════════════╧══════════╧════════╧══════════╛
Apply complete! Resources: 1 added, 0 changed, 0 destroyed.
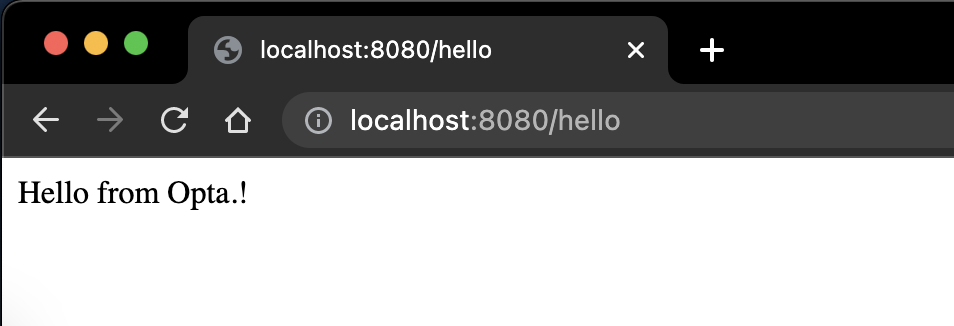
You can test your service by visiting http://localhost:8080/hello on your local machine browser.
- SSH into the container
opta shell --local -c hello.yaml

root@staging-hello-k8s-service-57d8b6f478-vwzkc:/#
- View container logs of your application
opta logs --local -c hello.yaml
- View Kubernetes events for your Application’s deployment
opta events --local -c hello.yaml
- If you have
kubectlinstalled, you can use it to connect to the local kubernetes cluster
# configure the kubeconfig file
# note: if you don't want to use the default path $HOME/.kube/config, set the env var KUBECONFIG first
opta configure-kubectl

# Opta created all the kubernetes resources for your service
kubectl get all --namespace hello
NAME                                           READY   STATUS    RESTARTS   AGE
pod/hello-hello-k8s-service-7b66c95997-xkml6   1/1     Running   0          20m

NAME            TYPE        CLUSTER-IP    EXTERNAL-IP   PORT(S)   AGE
service/hello   ClusterIP   10.96.194.3   <none>        80/TCP    84m

NAME                                      READY   UP-TO-DATE   AVAILABLE   AGE
deployment.apps/hello-hello-k8s-service   1/1     1            1           20m

NAME                                                 DESIRED   CURRENT   READY   AGE
replicaset.apps/hello-hello-k8s-service-7b66c95997   1         1         1       20m

NAME                                                          REFERENCE                            TARGETS                        MINPODS   MAXPODS   REPLICAS   AGE
horizontalpodautoscaler.autoscaling/hello-hello-k8s-service   Deployment/hello-hello-k8s-service   <unknown>/80%, <unknown>/80%   1         3         1          84m
You can also use Opta’s secret management to inject sensitive data into your applications.
To uninstall your application from your local Kubernetes cluster run
opta destroy --local -c hello.yaml
Example 2: Deploy a service using a local docker image
Now, let’s build an application locally and deploy it.
For this example, we will use our hello application (also available on github).
- Make sure that you have these files locally:
hello.yamlThe service Opta file.app.pyThe application code.DockerfileThe docker file to build the application.
- Set
image: AUTOinhello.yamlto use the local image. - Make a change to the returned text in
app.pyto validate that the new image is used.
Deploy The Application Locally
Build the image locally, let’s tag it with v2 for this example:
docker build . -t hello-opta:v2
Deploy the new image version to the local kubernetes cluster.
The opta deploy command will:
- Push the image to the local container registry
localhost:5000 - Update the kubernetes deployment to use the new container image.
- Create new pods to use the new container image - automatically done by kubernetes.
opta deploy --local --auto-approve -c hello.yaml --image hello-opta:v2
...
The push refers to repository [localhost:5000/hello/hello]
...
╒══════════╤══════════════════════════╤══════════╤════════╤══════════════════════════════╕
│ module   │ resource                 │ action   │ risk   │ reason                       │
╞══════════╪══════════════════════════╪══════════╪════════╪══════════════════════════════╡
│ hello    │ helm_release.k8s-service │ update   │ LOW    │ deploying new version of app │
╘══════════╧══════════════════════════╧══════════╧════════╧══════════════════════════════╛
...
Apply complete! Resources: 0 added, 1 changed, 0 destroyed.

Outputs:

docker_repo_url = "localhost:5000/hello/hello"
Opta updates complete!
Now let’s verify that the deployed application has our local changes:
# check the returned text
curl http://localhost:8080/hello
<p>Hello from Opta.! V2</p>%

# check the deployed image uses the local registry
kubectl -n hello get deploy -o yaml | grep image:
          image: localhost:5000/hello/hello@sha256:859eab99a173f975ebe9ba1c54a9fbf4498bf428ae46faa55770cb4272962d7a
When you are done, you can delete the hello application from your local Kubernetes cluster
opta destroy --local --auto-approve --config hello.yaml
Example 3: Stateful Example: A Todo list with Prometheus/Grafana
In this example we will deploy a Todo list with a Vuejs single page application frontend, a Django Rest Framework API backend and a Postgres database to store state. Additionally, we will also show how to enable a Prometheus/Grafana observability stack.
Follow this documentation for the full stack Opta example.
Limitations: What Opta Local is not
- Only one Kubernetes cluster (a.k.a. Opta environment) is currently allowed on Opta Local; you can deploy multiple services and helm-charts within this environment.
- TLS certificates and DNS are not supported.
- Advanced public cloud features like IAM permissions are not supported.
- Performance limitations and limited scale.
- It is not possible to choose which Kubernetes version to install.
- Opta Local’s Kubernetes cluster survives reboots, but it may be several minutes before the services deployed inside it are restored on the newly rebooted host. In general it is not recommended to store valuable information inside the local cluster.
All these features are supported in the public cloud. Opta makes it super-convenient to graduate from Opta Local to any of the big-3 public cloud providers (AWS, Azure or GCP).
Learn more about Opta for public cloud here.
A Note on the Environment and Service Opta Files for Local
You may take any Opta service file you currently use in a public cloud environment (aws/gcp/azure) and deploy it locally using the --local flag in Opta.
For public cloud providers, opta usually uses an environment yaml file that deploys the infrastucture, and one or more service opta files to deploy applications. When you run Opta commands with the --local flag on any service opta file, the environment key within the service yaml file is ignored and the service is instead deployed on your local Kubernetes cluster.
The environment opta files contains a key for the org_name. For local deployment, if you wish to specify the Organization name you can add an org_name key to your service opta file. The organization defaults to localorg if this key is not specified. Remember to remove this key from the service yaml files for public clouds (aws/gcp/azure).
Uninstallation and Cleanup
If you want to clean out Opta Local from the local machine, run these commands in the terminal
DOCKER_REGISTRY=`docker ps -aqf "name=opta-local-registry"`
docker stop $DOCKER_REGISTRY
docker rm $DOCKER_REGISTRY
~/.opta/local/kind delete clusters opta-local-cluster
rm -rf ~/.opta/local
Running these commands should remove the Kind Kubernetes docker container (along with everything installed in Kubernetes) as well as the local docker registry container. You can confirm this via the docker ps command.
In case you want to manually remove the Kubernetes Kind Docker container you can run
KCLUSTER=`docker ps -aqf "name=opta-local-cluster-control-plane"`
docker stop $KCLUSTER
docker rm $KCLUSTER
You can confirm that the docker containers named opta-local-cluster-control-plane and opta-local-registry have been removed by issuing the docker ps command.
Feedback
Was this page helpful?
Glad to hear it! Please tell us how we can improve.
Sorry to hear that. Please tell us how we can improve.